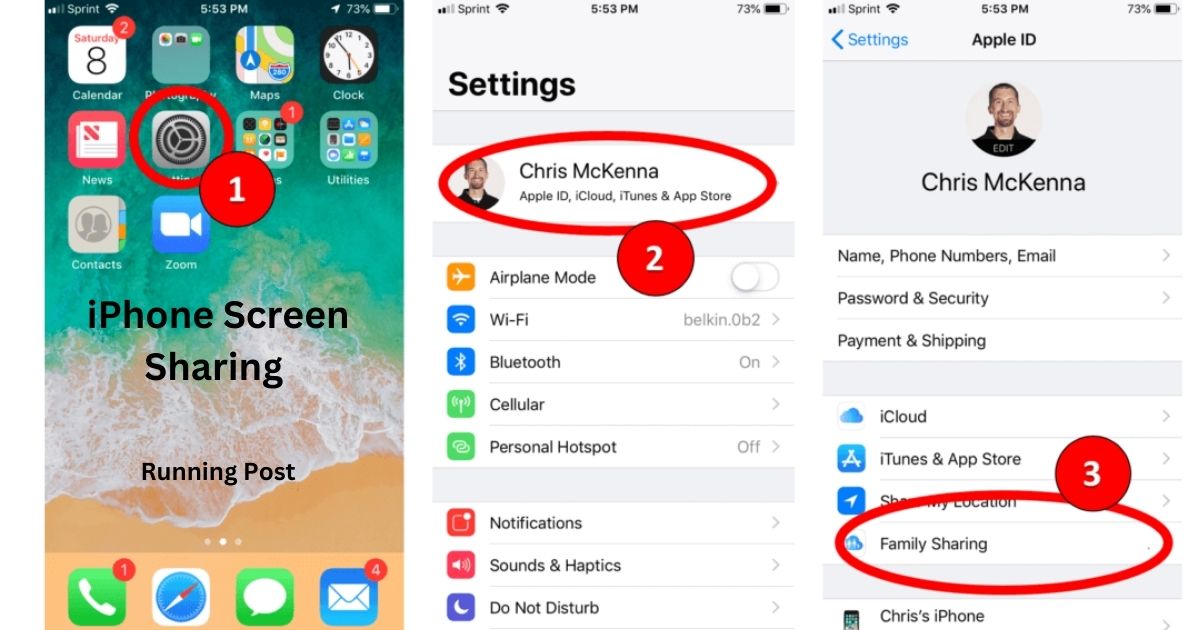
1. Introduction to Screen Sharing on iPhone
Screen sharing has become an essential feature for modern communication, especially in our increasingly digital world. For iPhone users, it means being able to show your screen to others in real-time, which can be incredibly useful for a variety of purposes, from giving remote presentations to collaborating on projects or simply helping a friend troubleshoot a problem. Screen sharing enables you to share your iPhone’s screen with others, so they can see exactly what you’re seeing. This feature is built into several apps and services, each with its own method for initiating and managing the screen share. Understanding how to utilize this feature effectively can enhance your communication and collaboration experiences.
Screen sharing on iPhone is beneficial for several reasons. It allows for seamless collaboration on work or personal projects, making remote teamwork more efficient. Whether you’re explaining a complex process, showing off a new app, or guiding someone through a troubleshooting process, screen sharing makes it easier to convey information clearly and effectively. Additionally, it can be a great tool for virtual meetings, online teaching, or simply staying connected with friends and family. With the growing importance of remote interactions, mastering screen sharing on your iPhone can significantly improve how you connect with others.
2. Preparing Your iPhone for Screen Sharing
Before you dive into sharing your screen, there are a few essential steps to ensure everything runs smoothly.
2.1 Updating Your iOS
To make the most out of screen sharing, it’s crucial to have the latest version of iOS installed on your iPhone. Apple frequently updates its operating system to introduce new features, improve performance, and fix bugs. Screen sharing capabilities can be enhanced with these updates, so running an outdated version might limit your options or lead to compatibility issues. To update your iOS, go to Settings > General > Software Update. If an update is available, follow the prompts to download and install it. Ensuring your iPhone is up-to-date helps in preventing any technical glitches and provides access to the latest features and improvements.
2.2 Checking Compatibility
Not all iPhone models support screen sharing, and some features might only be available on newer devices or specific iOS versions. To check if your iPhone supports screen sharing, you can refer to Apple’s official website or consult the support section of the app you plan to use for screen sharing. Additionally, make sure that any apps you intend to use are also up-to-date and compatible with your iOS version. Checking compatibility beforehand ensures a smoother experience and avoids any unexpected issues during your screen sharing session.
3. How to Share Your Screen Using FaceTime
FaceTime is a popular app for video calls among iPhone users, and it includes built-in screen sharing functionality.
3.1 Initiating a FaceTime Call
To start sharing your screen on FaceTime, you first need to initiate a call. Open the FaceTime app on your iPhone and either start a new call by entering the contact’s name or number or select an existing conversation. Once the call connects, you’ll be able to share your screen. It’s important to ensure that you have a stable internet connection to avoid interruptions during the call.
3.2 Starting Screen Sharing During a Call
Once you’re on a FaceTime call, tap the screen to reveal the controls if they’re not already visible. Tap the “Screen Share” button (it looks like a screen with an arrow), which will prompt a confirmation message. After confirming, your entire screen will be shared with the person on the other end of the call. You can now navigate through your apps, show documents, or demonstrate various features, and they will see everything you see.
3.3 Ending Screen Sharing
To stop sharing your screen on FaceTime, simply tap the “Screen Share” button again. This will end the screen sharing session while keeping the call active. If you wish to end the call entirely, you can do so by tapping the red “End Call” button. Stopping the screen share ensures that your privacy is maintained, and only the content you choose to share is visible to the other person.
4. Screen Sharing via Zoom on iPhone
Zoom is a widely used app for meetings and webinars, and it also supports screen sharing on iPhone.
4.1 Installing Zoom
To use Zoom for screen sharing, you first need to install the Zoom app from the App Store. Search for “Zoom” and tap the download button to install the app on your iPhone. Once installed, open the app and sign in with your credentials or create a new account if you don’t have one. Make sure to grant the necessary permissions for the app to access your microphone, camera, and screen.
4.2 Joining a Meeting
After installing Zoom, you can join a meeting by tapping the “Join” button on the home screen of the app. Enter the meeting ID and password if required, or use the “Join” link provided in an invitation. Once you’re in the meeting, you’ll be able to access the screen sharing options.
4.3 Sharing Your Screen in a Zoom Meeting
During the meeting, tap the “Share Content” button, usually located at the bottom of the screen. Select “Screen” from the list of options. You might need to grant Zoom permission to record your screen; tap “Start Broadcast” to begin sharing. Your entire screen will be visible to other participants. Navigate through your apps or documents as needed.
4.4 Stopping Screen Sharing
To stop sharing your screen on Zoom, tap the “Stop Share” button, which will end the screen sharing session while keeping the meeting active. If you wish to leave the meeting entirely, tap the “End” button and choose “Leave Meeting” from the options.
5. Using Other Apps for Screen Sharing
Besides FaceTime and Zoom, several other apps offer screen sharing capabilities on iPhone.
5.1 Microsoft Teams
Microsoft Teams is a powerful collaboration tool that also supports screen sharing.
5.1.1 Setting Up Microsoft Teams
To use Teams for screen sharing, download and install the Microsoft Teams app from the App Store. Open the app, sign in with your Microsoft account, and set up your profile. Ensure that you allow necessary permissions for microphone, camera, and screen access.
5.1.2 Sharing Your Screen in Teams
Join a meeting in Microsoft Teams and tap the “More options” button (usually represented by three dots). Select “Share,” and then choose “Screen” from the available options. Confirm your choice, and your screen will be shared with the meeting participants.
5.2 Google Meet
Google Meet is another option for screen sharing, integrated with Google Workspace.
5.2.1 Installing Google Meet
Install the Google Meet app from the App Store and sign in with your Google account. Ensure you grant necessary permissions for the app to function correctly.
5.2.2 Sharing Your Screen in Google Meet
Join a meeting in Google Meet and tap the “Share” button. Choose “Screen” from the options and start sharing your screen with other participants. You can navigate through your apps and documents while they see everything on your screen.
5.3 Skype
Skype is a long-standing tool for video calls and also supports screen sharing.
5.3.1 Setting Up Skype
Download Skype from the App Store and sign in with your Microsoft account. Make sure to allow permissions for camera, microphone, and screen sharing.
5.3.2 Screen Sharing in Skype
During a call, tap the “More options” button and select “Share screen.” Confirm your choice, and your screen will be visible to the other call participants.
6. Tips for Effective Screen Sharing
To ensure a smooth screen sharing experience, consider these tips.
6.1 Ensuring Good Network Connectivity
A stable internet connection is crucial for effective screen sharing. Weak or intermittent connections can lead to lag or disconnections, which can disrupt your session. Connect to a reliable Wi-Fi network if possible, and close any other apps that might be using bandwidth.
6.2 Protecting Your Privacy
Before starting a screen sharing session, close any apps or notifications that you don’t want others to see. Be mindful of sensitive information on your screen, as anything visible will be shared with your audience. Consider using a screen privacy app or adjusting your notifications to avoid interruptions.
6.3 Managing Notifications and Alerts
Notifications and alerts can be distracting during a screen sharing session. To manage them, enable “Do Not Disturb” mode on your iPhone. This will prevent incoming calls, messages, and other alerts from interrupting your screen share and ensuring that your presentation goes smoothly.
7. Troubleshooting Common Issues
If you encounter problems while screen sharing, here’s how to address them.
7.1 Screen Sharing Not Working
If screen sharing isn’t working, first check that your app and iOS are up-to-date. Restart your iPhone and the app to resolve any temporary glitches. Also, verify that you have granted the necessary permissions for the app to share your screen.
7.2 App Crashes During Screen Sharing
App crashes can be frustrating. Ensure that you have the latest version of the app installed. If crashes persist, try reinstalling the app. If the problem continues, consult the app’s support team for further assistance.
7.3 Poor Quality or Lag
Poor quality or lag during screen sharing can be due to a weak internet connection. Switch to a more stable network if possible. Additionally, close any other apps that might be using bandwidth to improve performance.
8. Conclusion About iPhone Screen Sharing
8.1 Recap of Key Points
Screen sharing on iPhone is a powerful feature that enhances communication and collaboration. Whether using FaceTime, Zoom, Microsoft Teams, Google Meet, or Skype, knowing how to set up and manage screen sharing can significantly improve your remote interactions. Make sure your iPhone is up-to-date, check compatibility, and follow best practices for a smooth experience.
8.2 Final Thoughts on Screen Sharing
Mastering screen sharing on your iPhone can greatly streamline your digital interactions. With the ability to share your screen, you can effectively present information, collaborate with others, and stay connected, no matter where you are. Embrace the convenience and flexibility that screen sharing offers and enhance your remote communication skills today.
You Also Like It:
Dosage, Side Effects and Composition, Ulcuprazol Uses
 By
By
 By
By
 By
By

 By
By
 By
By